Knowing the Generator Size You Need to Power Your Home

Depending on where you live, having a backup generator can make the difference between shivering through a winter power outage or staying warm and toasty while you wait for electricity crews to do their work. Several considerations come into play when thinking about the size, or wattage, of generator that the typical person needs to have at home.

Starting Power vs. Running Power

    Some appliances require more power to start running than is needed to keep running. According to Honda Power Equipment, a refrigerator requires 1,200 watts to start and 132 to 192 watts to keep running. Honda notes that these numbers are only for the Energy Star-rated version---non-rated refrigerators require more power than that. Numbers for 19 different household appliances are listed in a wattage guide, including subsections under appliances such as computers, televisions and microwave ovens.

Portable or Stationary?

    The choice between portable or stationary comes down to what you need the generator for. If it is merely to run essential appliances---refrigerator, furnace, stove and lights---for a short amount of time, then a portable generator may be the best bet. These generators have outputs ranging from 1,000 watts (the Yamaha EF1000ISC) up to 17,500 watts (the Generac Guardian Ultra Source).
    Stationary generators are usually hooked into natural gas or oil lines and wired directly into the electrical system of your home. These behemoths output well into several thousand kilowatts of power for almost infinite amounts of time. The Carrier brand 35-45kW Air-Cooled Home Standby Generator, for example, outputs a running wattage of 26kW to power a 5,000-square-foot home. Generators this size are best used for either long periods of time or for large power needs.

What Are You Powering?

    Honda Power Equipment makes much of a concept it calls "Power Management," which relies on three considerations---importance, running time and number---to effectively use small generators.
    In Honda Power Equipment's example, a refrigerator (1,600 starting watts/200 running watts), plus a furnace with a horsepower fan (1,600 starting watts/600 running watts), plus a television (300 watts flat), a microwave (1,500 watts flat) and five lights (60-watt bulbs = 300 watts) equals to 5,300 watts.
    It applies "Power Management" to show that if you start up the refrigerator and furnace at different times, you save one start-up cost of 1,600 watts; and running the microwave only intermittently saves you an occasional 1,500 watts. Thus, your constant power usage is a mere 1,400 watts (television, lights, refrigerator and furnace) and your occasional use is 1,600 watts (intermittent microwave use switched with starting costs of refrigerator and furnace). This means that a 3,000-watt generator would fulfill your power needs, also presenting you with a significant cost savings.
    What you're interested in, then, is not the highest total wattage, but rather the wattage that you plan to use on a continuous basis. That number, and whether you want to worry about turning appliances off and on, will determine what size of generator you choose.
Wiring a House for 220V

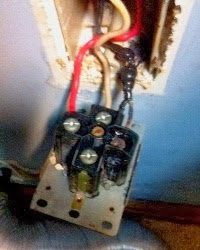
Installing 200amp service throughout a house allows for more power usage. However, upgrading to 220V electrical wiring may not be necessary to handle your house's electrical needs unless you are installing electric heat or central air conditioning. Adding new circuit breakers may be all that you need. In most cases, this will allow you to connect additional appliances and electronic equipment that may require 220V. Installing new circuits often corrects the problem of appliances or other electrical devices too large to operate off a single circuit. But if you decide to go ahead and wire your house for 220V, although it may seem like a fairly easy job at first, it does need to be done right. You must think safety, safety and more safety whenever working on any project involving electricity.

Instructions

    1 Contact your local building authorities to find out if you need a permit to complete the work. Local building code regulations may vary according to your area of residence. There are also state codes and standards you may be required to follow, most of which are now based on a national model. While 12-gauge wire should be appropriate for most rewiring jobs, check first with your electric power company for any specific requirements or restrictions. For 220V appliances, 10-gauge wire is required.
    2 Turn off the power at the main electrical panel box. Use a circuit tester to make sure that the power is off before beginning work. It is crucial that wires not have any power in them. Make sure that no one else can turn on the power while you are working. You might want to hang a warning sign on the panel box so that other household members know that you are working with the wiring. Better yet, lock the box if you can.
    3 Determine the number of circuits that you will need. Do this after deciding how many outlets, switches and lighting fixtures will be placed on each circuit. All electrical wires will run from the circuit breaker box. Even if you plan to do the job yourself, you might want to consult first with a qualified electrician for some advice. Use breaker circuits that you are certain can handle 220V wiring.
    4 Go up into the attic or crawl space when you are ready to begin, because you will be running wires inside the walls of the house. You will need someone to remain below to assist you from that location. Pull new wire through the walls by tracing the old wire coming from the circuit breaker box. Place the new outlets, switches and lighting fixtures located in each room on a separate circuit to prevent overloading. This may even be required by local building codes.
    5 Rewire one room at a time. Use electrical cable with either two or three wires. The type of cable will depend on the types of power plugs different appliances may require.
    6 Pull some cable from the receptacle box, allowing about 12 inches to use for wiring in the new receptacle. Strip back the insulation covering on the electric cable wire about 5 inches. You will see copper wiring that you will use for grounding.
    7 Strip back the white and black wires about an inch so that you can hook the wires to a new receptacle outlet. Attach the white wire to the steel screw on the outlet; black wire to the copper screw; and copper ground wire to the ground screw positioned at the top of the outlet. If working with cable wire needed for 220V, strip back the red wire and attach directly into the appliance or a special appliance receptacle as per the manufacturer's instructions. These should be color-coded for correct placement.
    8 Likewise, attach the black and white wires to the appropriate screws when installing new light switches. You will be working with a black and white wire for a single-pole light switch. When installing a three-way light switch, connect the black wire to the switch. Next, hook up the white wires together, taping them with black electrical tape, and then cap with a wire nut. Twist the copper wires together, leaving the end of one wire a bit longer. Attach that wire to the ground screw at the top of the switch.
    9 Call an electrician when it is time to tie the wiring into the service panel box. Even when the main breaker is turned off, there is still power coming into the box to the main breaker. Whether or not you think that you have the ability, unless you are an expert, it is recommended that you not try to do this job yourself. Keep safety on your side and hire someone who works with electricity all the time. You might also want to have your work inspected before turning the electricity back on.

Knowing the Go Green Appliances

Home appliances make up a significant portion of your annual energy usage and costs. If you are trying to make your home more energy-efficient and environmentally friendly, consider replacing outdated, inefficient appliances with newer, more efficient models. Although your upfront costs may be a bit higher than with less efficient products, the long-term savings will usually compensate for the initial investment.

Types

    Energy-efficient products are available for virtually every area of your home, including the kitchen, bathroom, office and laundry room. Green home appliances range from complex heating and cooling systems to simple small appliances. According to the Arizona Public Service Company (APS), heating and cooling equipment and water heaters are the most energy-consuming home appliances, followed by large appliances such as refrigerators, clothes washers and dryers, dishwashers and kitchen ranges. As noted by the American Council for an Energy Efficient Economy, however, other appliances that are often overlooked, such as small appliances and light fixtures, also use a significant percent of total energy.

Benefits

    Energy-efficient appliances offer a variety of benefits for consumers. One of the primary benefits of green appliances is decreased energy costs. According to Energy Savers, Americans spend about 20 percent of their energy costs on appliance operation. The Energy Star label provides an estimated annual energy cost for certified appliances for consumer guidance. In addition to lowered energy costs, green appliances are beneficial for the environment, since they decrease harmful carbon dioxide emissions into the atmosphere, either directly or indirectly.

Shopping Tips

    Although it is not the only legitimate certification program, the Energy Star label is usually a dependable way to measure product efficiency. The Energy Star program is jointly operated by the U.S. Department of Energy and the Environmental Protection Agency (EPA). Energy Star--certified appliances are guaranteed to exceed the minimum federal standards for efficiency. The program certifies most types of appliances, with the exception of stove ranges and ovens. Some appliances may also be eligible for tax credits or rebates.

Considerations

    In addition to purchasing energy-efficient home appliances, proper usage is also a key component to decreased energy use. Use energy saver options on any appliances you have, such as dishwashers. Keep refrigerators away from heat sources, such as ovens and stove tops. Wash clothes in an appropriately sized load to avoid wasting water and electricity. Finally, have complicated appliances, such as heating and cooling equipment or plumbing appliances, installed by a professional. Improper installation can decrease efficiency and reduce any potential energy savings.

Tips On Starting an Appliance Repair Company


How to Start My Own Appliance Repair Company

Starting your own appliance repair service is a potentially lucrative and enjoyable venture. It can be operated from home and it can be started for around $10,000 to $50,000. While basic education (and potentially certification, especially at the manufacturer level of expertise) is necessary, and independent contractor savvy aids the startup process, an appliance repair business can be an immediate goal.

Instructions

    1 Contact appliance repair associations such as the National Appliance Service Association to find local certification courses.
    2 Consider specialized continuing education, such as training in commercial food service and restaurant equipment repair. The videos offered at A1service.com are helpful.
    3 Advertise in community ads and telephone book listings, such as Yellow Book Ads, to reach local prospective clientele. You can reach both consumers and commercial prospects by purchasing ad space in multiple listing categories.
    4 Determine your hourly rates. You'll need to separate the idea of a yearly income from a yearly salary (as a business owner you'll need to pay for the expenses a regular employer would carry) and determine the personal and business cost of appliance repair.
    Use a tool such as Salary.com's salary wizard to figure the average cost of running your business by searching the employer reports. Budget out personal and business costs alongside your total billable time using a rates calculator to determine optimal hourly rates.

How to Remove Rust Stains From Appliances

Many appliances get rusty spots at some time or another. Refrigerators, stoves, dishwashers, washers, dryers and other household appliances are all prone to rusting. Although appliances have a protective coating that prevents rust, if this coating wears away or there is damage to an appliance, rust may form. The best line of defense is to treat the rust stains when you first notice them and to dry out areas that are prone to rust.

Instructions

    1 Scrub off the rust. Take a kitchen scrubbing pad or steel wool and scrub the rust stains. Clean off the area with a sponge or cloth. For surface rust or small stains this may be all that is needed.
    2 Apply mineral oil. Using a scrubbing pad apply a small amount of mineral oil to the rust stains. Allow the mineral oil to settle into the rust. Ten or fifteen minutes later, scrub at the rust with steel wool or scrubbing pad. Use soap and water to wash off the rust and the oil residue. Dry the area.
    3 Make a rust removing paste. Mix one part lemon juice with two parts borax to make a paste, then apply it to the rust stain on the appliance. Use a scrubbing pad or paper towel to do this. Let the mixture remain on the rust stains for 10 to 30 minutes, depending on the size of the rust, then scrub the stains with a scrubbing pad. Wipe the area clean to remove the rust and the paste. Wipe dry. Use this paste for stubborn rust stains.

Saving Space in a Small Kitchen

A small kitchen can make preparing a simple meal a big headache. Rearrange, de-clutter and maximize your workspace to squeeze more functionality out of a tight kitchen. Small changes that cost little, like changing the direction your refrigerator door opens, can make big a big impact on how well a tiny kitchen functions.

Instructions

    1 Clear the clutter on the counter with under cabinet mounted appliances. Small kitchen appliances hog valuable counter space and can be a real eyesore. An under cabinet coffee maker, for instance, can clear up as much as 2 feet of counter space. Look for mounted can openers and microwaves as well.
    2 Put small appliances away when youre done with them. Toasters and can openers take up valuable kitchen real estate and need a lot of cleaning to look presentable. Keep your small appliances stored in your kitchen cabinets when not in use.
    3 Remove your cabinet doors and hang curtains or arrange open-front displays. Opening and closing your kitchen cabinets requires space -- and sometimes in a small kitchen there's not room for you and the open cabinet door. To reclaim that kitchen space, use cabinet curtains instead. Curtains slide open, requiring no additional space, unlike the swinging action of a kitchen cabinet door. Showcase attractive service pieces on open cabinet shelves.
    4 Roll in more counter space. In small kitchens, tiny counter spaces can make cooking projects a nightmare. Consider a rolling kitchen island that can add workspace as well as additional storage. Look for an island with leaves that raise up to make more counter space. When the work is done, fold down the leaves and roll away for storage.

Kitchen Appliances From the 1950s


Kitchen Appliances From the 1950s

The Great Depression of the 1930s and the war years that followed was a time of sacrifice in America. For more than 15 years, the populace either could not afford new appliances, or the war effort had made the raw materials needed to manufacture such luxuries nonexistent. After the armistice was signed in 1945, weapons factories quickly retooled to meet the growing demand for modern refrigerators and stoves to fill the kitchens of newly built homes.

Color

    The men had their colorful cars; the women had their shiny, new appliances.
    Advertisers of the era began publishing full-page color ads to entice war-weary citizens to buy the latest in brightly colored kitchen-based time-savers for the modern housewife. Most women were stay-at-home moms who relinquished work outside the home to support returning veterans. Their reward was a bright and cheerful environment in which to work. This meant refrigerators and stoves in bright yellow, robin's-egg blue or mint green with chrome detailing.

Postwar Advances

    Arborite and chrome appeared on kitchen tables and countertops to give the kitchen surfaces of the '50s a shiny, easy-to-clean alternative to wood. Cabinets were custom-built to provide a seamless transition from refrigerator to sink and stove. New homes were built with the electricity required to power appliances both large and small. The baby boom was in full swing, and young families appreciated the time savings realized through the use of modern gadgets.

Small Appliances

    As well as the colorful new refrigerators and stoves that appeared on the scene, the kitchen of the '50s boasted smaller labor-saving appliances as well. The chrome-plated, pop-up electric toaster made toast timing and surveillance a dying art. Portable electric food mixers and Mixmasters, complete with removable beaters and bowls, replaced their hand-cranked predecessors. Early toaster ovens made preparing TV dinners a breeze. The electric steam iron was much lighter and easier to use than the old cast-iron models.

Prices

    Mass production made the appliances of the 1950s affordable to more people than ever before. A gas range could be purchased in New York in 1950 for $144.95. A portable electric food mixer, bought in Wisconsin in 1957, cost $18.95. A 1959 steam iron, purchased in California, cost $9.99. "Cash only" was not the only method of purchase, as it had been in the lean years. Appliances could be purchased immediately and paid for in monthly installments.